Monday, May 9, 2011

Lovin' Lightroom

I have really fallen in love with Lightroom 3. I had previously used Photoshop Bridge. With Bridge, I would apply some rudimentary settings.  I would then take my images to Photoshop and apply actions (these are meant to be handled by Bridge, but I find that system clunky at best). The organization Bridge applied was nice and it allowed me to non-destructively make changes...
Now, with Lightroom, it truly has taken my processing to a whole new level. I still get the non-destructive editing... but now I have so much more control over my images... from noise to components of tonality, to special looks.
Besides having much more control over the organization, virtual copies, and snapshots of my processed images, the Presets have given me great control and creativity over my work.
I began by downloading a few presets. I studied what had been done in those and then tweaked them to make my own. The next step was to create presets from scratch.
It's kind of like going to a restaurant, finding something that really sparks your fancy, and then coming back home and trying to re-create it. I feel like I have the tools to do so with Lightroom. This is beginning to sound like an ad. But being able to re-create a look is really important to me, because it gives me the confidence to select a setting and take control of it and give it the feel that I want. In addition, it gives me the flexibility to offer my interpretation of the setting. It's like reading Jane Eyre and having my vocabulary soar to new heights... I just can't help but be inspired by the quality works of others. Enough rambling...

I have alluded in the past to enjoying Cliff Mautner's work.
I have developed a few presets that help me get a similar feel to my photographs. I really like the low key look with the highlights bringing the viewers attention to just what I am trying to portray. It helps me communicate better through my images.

Here is an example... the first image is how it came straight from the camera:
The part I want the viewer to focus on is the expression with an emphasis on the eye.  They are over-exposed here.  Since I am shooting in RAW format, most of the detail is going to be retrievable.  
I made a setting that decreased the exposure by about 1.5 stops and separates out the tones a bit... bump up the lights, tone down the darks (basically creating contrast selectively, without doing much with the shadows or the highlights), and applied a vignette.
With one press of a button (applying my preset), I get this:

There are a few images where I would take them to photoshop or use the Adjustment Brush in Lightroom to do some selective lighting... but that seems to be the exception.

So, I really like Lightroom and the control it gives me over my images.

Pic of the Day:
This guy does some great work... He merges the real with the surreal with his photography and Photoshop in his work.

Saturday, May 7, 2011

Game Day

Today was busy... took my little point and shoot camera up to hike the Y in Provo with the Youth.  Then did spring cleaning... took a break to run through the sprinklers and have a picnic... finally ended up over at the Gardens to shoot part of a wedding, with a break in there to do a prom group.  Have to say... the prom group was a lot of fun (cute couples --- love working with the sweet sixteens)... got some good experience with the wedding shoot (thanks Suzie)... know what I would do differently next time... and hopefully I can share some of these.  For today's post, here is a slide show of the prom shots.  I shot in manual mode... Stopped down the exposure by 1 stop.  Shooting at f4.5 and 1/400.  It was in the shade, so I shot at ISO 200.  Had a SB800 flash on the camera set at 1/128 and it popped the off-camera SB600 flash which was set to Manual 1/4 power at 50mm.  I had an assistant (thanks Andy) holding the flash at about 3 meters from the subjects.


And just a handful from the wedding shoot...


Friday, May 6, 2011

Light Meter

Light Meter  -----   Metering  ----- Exposure Bias  -----  Thinking Like Your Camera  -----  Thinking Beyond Your Camera

LIGHT METER -
Simply put, the light meter in your camera determines how much light is going to look correctly exposed. It then makes decisions based upon that information. In Program Mode, it sets the aperture (fstop) and the shutter speed -how big the window opens and how long it opens.

METERING -
The light meter can be pin-pointed to the very center of your frame (called Spot Metering), it can consider the entire frame (Matrix metering), or somewhere in between (called center-weighted).
Spot metering is nice because you can point your camera to the very spot you want exposed correctly, press half way down (or lock the exposure) and then compose your shot and fire.  Matrix metering considers the whole picture and tries to find an exposure that will produce the bets results.

EXPOSURE BIAS -
Most cameras have an exposure bias.
 That means you can tell it to under compensate or over compensate. Why would you want this? Well, what if you find that you just like lighter pictures all around. Then change your exposure bias up a few steps.


THINKING LIKE YOUR CAMERA -
In order to correctly expose your image (especially your subject) - you need to think like your camera.  Think correctly expose each part of your image... the background, the foreground, the subject, the highlights, the lowlights.  You get one image that combines all of that... the trick is to keep it simple enough to be aesthetic.

THINKING BEYOND YOUR CAMERA -
Landscapes and still life allow us to make multiple images taken at different settings (multiple exposures) and  then combined them using software  -- HDR.
For person shots -portraits, weddings, etc - we don't have that luxury.  Here's a short video from a wedding photographer named Cliff Mautner.  Here he is talking about using a kicker flash.  But note that he talks about using an exposure bias (I think he speaks in terms shooting 1.5 to 2 stops below his ambient light reading).


Finally, thinking beyond your camera. In Cliff's work, he does a lot of work with flash and/or directional lighting. In order to emphasize that single light source, he underexposes the rest of the shot. So he probably meters on something that he wants to underexpose... he has his exposure bias set down a stop or two -- he then sets the fstop and shutter speed manually to match that meter reading (most likely on spot metering or center weighted) -- then he kicks in a flash or has the window light do the highlighting for him. This is called low-key lighting, where the overall image is dark. Notice how your eye is led right to the highlighted areas.

So, I tried this myself one time with limited success:

So the Pic of the Day is going to have to be Scotty... because he's 3 today.  Happy Birthday Champ!

Wednesday, May 4, 2011

Understanding f-stop - how big can you go?

I mentioned yesterday that we would be explaining the light meter.  Let's hold off for a post until we get this f stop thing figured out.   -Simply put, the light meter is a sensor that tells us how much light is bouncing back to the camera.  -But more on that later.
For now --- What is f stop?  I will take a couple of posts to explain and really explore f stop. This is one of those things like Chemistry class for some pre-med students... or the Eagle Project that never got done... It is where people seem to hit a wall of understanding, give up, and go back to plan b.
So how do we grasp it? First; trust me that it is really not unsurmountable. And please don't close your eyes, because we won't say the 'm' word. {a-hum, math}

Let's go back to our common ground with cameras... our eyes.  The size of your pupil determines how much light enters your eyes.  Your brain has a built in light meter and relay system that is very responsive... except for first thing in the morning when that system has been resting all night.  If you look into a bright light, your pupils rapidly constrict down because of the meter in your head that is protecting your retina from too much light.  In order to make out any detail, we need to have just the right amount of light.  Too much is overwhelming and all we see is white.  Not enough fails to illuminate the small details.  It's all about recording reflected light on our retina.  In camera terms, it's about getting the right amount of reflected light to the recording sensor (in digital) or to the film.
Contrast the eye with a video camera - or your point and shoot camera.  Think of what happens when you point the camera to someone in a room - and then to the window.

  The light outside is far brighter, but it takes about a second for that iris to close down so that it's not just a 'blown-out' white.  After a second, the iris has closed down a bit and the correct colors and lighting outside are seen.

But what happens to the inside?  It becomes underexposed and maybe even black.  So the camera is an all-or-none deal.  One setting, one aperture.  The above picture is exposing for the person inside the room (with less light reflecting off of the subject).  While the other image has more light outside and the exposure is adjusted to that outdoor light, leaving the indoor detail underexposed and undetected.
APERTURE: the size of the opening of the iris.

Terminology time:
Just like in our eyes, the brighter the subject, the more closed the aperture needs to be.
THE NUMBER GAME:
The f stop (sometimes called the f number) of the camera is a number such as 1.4, 2.8, 3.5, on up to 22.  It is really a fraction.  Oh no, fractions!  Take a deep breath... It just means that if I am opening the aperture to an f stop of 22, it is really 1/22.  Said in other terms... if I have a pecan pie in a glass dish and I shining a light on the other side of the dish.  I cut the pie into 22 pieces. Only 1 of those pieces is missing, and the light can only shine through that one section of the pie.  That's a really small iris, opening, or aperture.  If I open the aperture up to 3.5, it is really 1/3.5.  That means I cut the pie into 3.5 pieces.  Then I take 1 away.  That leaves a larger gap (or opening) for the light to shine through.  One of three is much larger than 1 of 22.

Instead of a pie dish, your camera has a glass lens.  And instead of pie, it has blades that open up or close down to make the aperture smaller or larger.
The iris in this instance is closed way down, most likely at f 22 (or 1/22)
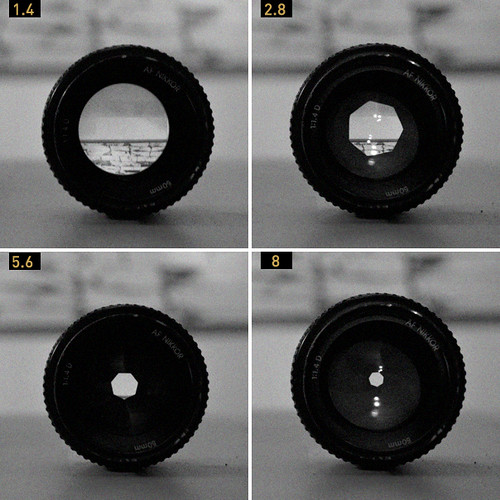
Here are some example of iris size and their f stops shown upper left.

The larger the aperture, the smaller the f number or f stop.  22 is tiny aperture.  1.4 is all the way open - or very large aperture.

This begs the question of why is the highest f stop 1.4 and not 1?  Wouldn't 1 be totally open? Well, yes, but as far as I know, 1.4 is the larges it can go.  The blades on the iris open, but don't retract.  

For more explanation on calculating the f stop (or f number) click here.

In this post, we only talked about f stop in regards to light gathering. The smaller the f stop, the more light is able to reach the sensor (where the image is recorded).  Thus if my picture is overexposed or too bright, I could stop down the f stop to a larger number to let less light in.

F stop essentially affects two things... light entering the camera and depth of focus.  Today we just spoke of f stop in regards to light.  At another date we will try and tackle the depth of focus.  It is critical, but can be difficult to explain.

Pic of the Day
taken at f 1.4

Tuesday, May 3, 2011

baby steps continued

So yesterday was a review of the first 3 steps based upon a few conditions --- how close is my subject (lens), how much light do I have to work with (ISO), and do I want to add light (flash).

The next step is where there can be a lot of variability. Select a mode to shoot with. Do I choose to shoot in P (program mode), A (aperture priority), S (shutter priority), or M (manual).  Let's dive into these modes.

If I want the camera to decide what settings to use, I choose P mode.  I can probably count the number of times I have used P mode in the last year on one hand.  But if we go back 12 years ago to my first SLR camera, I was in P mode virtually all the time.  So I think of P mode as a great option for beginners.  And for the more seasoned photographer, you can use P mode when you have a situation where you really need to get a picture fast and don't have time to think.  This mode determines what f stop and what shutter speed.  And if you have your camera in AUTO ISO, it will also determine what ISO to use.

Moving on... If I know my depth of focus, but don't want to concern myself with the shutter speed, I will choose A mode (aperture priority).  This allows me to select the f-stop and then have the camera decide how long the shutter will be open based upon that need.  I decide this based on two criteria... what depth of focus do I want and how much light to I have to work with.  Opening the f-stop wider (smaller numbers like 1.4, 2.8, 3.5) lets more light in my lens but also decreases the depth of field (or focus depth).  They are sometimes referred to as shallow focus and deep focus.

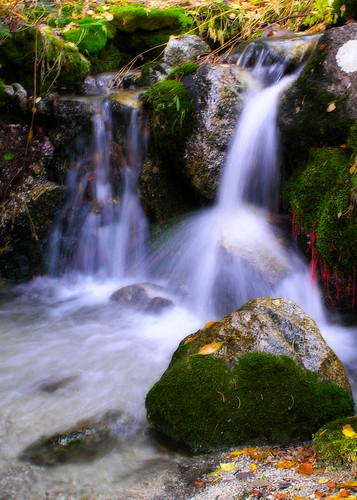
I make more decisions based upon focus depth rather than shutter speed, probably because I am taking more portraits.  So for me, S mode is only rarely used.  The exception is when I care about working with the motion of a scene.  For example, water falls tend to look much more aesthetic when the water is flowing.  In order to capture that, the exposure needs to be open longer (longer shutter speed).  In this image, taken with my old Olympus point and shoot camera, I put the camera in S mode and chose a shutter speed of 1/3 (which is to say .333 seconds).

Finally M mode, or manual.  I won't spend much time here in this post, but I do spend probably 60-80% of my time shooting in this mode.  When you find a style that works for you, when you want full control of the camera, or when you are shooting with a flash or two or three, M mode can really give you control of everything, especially your lighting.

CASE STUDY:
My youngest child is playing in his room.  There is diffuse light coming in from the window, so the lights in the room are off.  Let's go through the steps so far...
I know I want to do a close up, because for me with infants, I want to capture their expressions and the details thereof.  So I keep my 24-70mm lens on and I will play around with the zoom, probably between 40-70 will be what I shoot.  I am thinking higher ISO because the light from the window is my only source of light and the room light (ambient light) is very dim.  So I try ISO 800. I could try as high as 1600, but 800 is where I stop.  Finally, should I use a flash or not?  The flash would fill the background with some light and make the room look more evenly brighter.  But I decide I want to have the directional lighting the window is going to provide and I don't want to mess around with multiple sources of light... just the one window light.  So no flash.  I know that this is a potentially moving subject, so I put it in A mode and play around with the f-stop.  5.6, 4.0, 3.2.  I am doing this while pointing my camera at the subject so that the correct shutter speed is selected by my camera.  I see 250 (which is 1/250th of a second).  This is plenty of speed to stop the movement and create a sharp image.  So I snap a few shots...
If you look closely, you can see the window in his eyes.  This use of single light source creates some good dimension with lighter on his left side of face and darker on his right side of face.  In addition, the background is less exposed than he is because he is closer to the light source (the window).  This helps him stand out.  My focal length is 70mm (zoomed in on this lens).  With the help of my online DOF calculator, I can see that my focal length is about 3.5 inches (more on this later).

Tomorrow: more talk about the light meter in your camera and making your camera see what you see.

Pic of the Day:

Monday, May 2, 2011

breaking it down - aka "Baby Steps"

Here's the scenario.  I grab my camera, turn it on, adjust some settings, and go to take the picture.  Why is it black?  Yup, even I leave the lens cap on occasionally.
So what steps do I take?  Today, I will start with the first three.  Forgive me if I leave out any steps... this is the first time I have really thought about what I do step by step.

1) Decide which lens to shoot with.  Most of the time, I leave the 24-70mm lens on... esp for indoor shots and outdoor landscapes.  If I am shooting portraits outdoor with more room to shoot or I want to grab some real detail, I grab the 70-200mm.  And on some occasions, I will grab the 300mm.  These are all fixed aperture lenses (f2.8).  If you have a lens with variable f-stop (kit lenses that come with many cameras) no problem - I will address this in the next post

NOTE: Steps 2 and 3 are quite simultaneous

2) Turn on the camera and check the ISO.  If I am shooting low light, I will push it up to between 1250 and 2000.  If I am out of doors it will be set at 200 or lower.  And then you have the in between 400-800 where there is sufficient light indoors, but you are shooting a subject that will be moving quite a bit.
3)  I decide whether or not to use a flash.  The flash will help highlight my subject, create ambient light, or act as a filler for shadows in the outdoor shots.  (Here I also decide whether or not I will grab a second flash to be off-camera)

Oh yah, this is a good time to take off the lens cap so I can move on to the next few steps...

...to be continued...

If you are ready for more of the WHY behind these steps, I have added some additional information here:
Step 1:  lenses... my subject matter and my depth of field are the two major deciding factors for lens selection.  In general, for shooting landscapes (including skies) I want wide angle.  At times, it would be ok to do a single portrait at something less than 35mm.  Remember that distortion on portraits is generally not very flattering. Wide angle gives me large depth of field, so my focus will be infinite most of the time.  As I go longer on my lens (higher mm or ZOOM), the shorter my depth of field or focus will be.  Remember the calculation considers distance to subject, fstop, and mm of lens (remember to consider crop factor).

Step 2: the ISO.  The reason I choose the ISO first is that it is the canvas of the image.  If an oil painter used a napkin to paint on, the results would be sub-par at best... Same with a photographer shooting ISO 64000 on a little point and shoot camera.  ISO 200 on an upper end camera is more like a proper canvas.  The graininess of the image (or pixelation) is determined by the quality of canvas.  Thus, with the newer cameras, they are, in this analogy, trying to make the smaller canvases work like larger or higher quality canvas material so that you can push the ISO more and more with better results.  The size of the sensor is the major determinant in the quality of the image, especially as you begin to shoot in lower light and push the ISO higher. The challenge for camera companies is to have the processors (computers) in the newer cameras do more with less light (thus achieving higher quality images and less noise with the same size sensor).  

Step 3: to flash or not to flash - and to flash on camera only, or off camera as well - this is where we get into the exposure, style, multiple light sources, and much much more... so this is much to large to define here.  

LINKS

IMAGE of INTEREST (Pic of the Day)
Tough image to expose correctly.  Well done with the fill flash.  Obviously off camera flash. 
Shot at 48mm, f8.0 at 1/320 at ISO 400
From the photographers notes:
Lighting -
Alienbee AB1600, camera-left just out of the frame at 1/8 power into large softbox that was threatening to take off like a sail, and would've gone over the cliff that the b/g were standing on if not for an assistant with cat-like reflexes.
Bare Vivitar 283 at 1/16 power camera-right and behind couple.

Wednesday, March 30, 2011

new platform

For a few years now, I have used Adobe's Bridge to organize and process my images, delving into Photoshop as needed.
Well, I decided to try out Lightroom now that version 3 is our.  I have debated Lightroom or Apple's Aperture.  Due to not being happy with how iPhoto handles things, I opted for Lightroom.

Bottom line:  I am sold. There are so many things I like about it.  Not everything, but mostly.  I have a few hang-ups with the way it brings in my images... also if I have multiple catalogs, they are seen completely separate to Lightroom.  But all-in-all, it is a great way to organize my photos, process, (love the presets - especially as i have created my own), and the other modalities such as Web and Slideshow.

A few other qualms i have with it are the zoom factor is a preset amount... unlike Photoshop's zoom feature that allows you more flexibility (in my mind).  In addition, the keyboard shortcuts are not very contiguous with Photoshop.  And they sync (processing multiple images simultaneously); while it gives me more options, seems a little jumbly.

I really like the noise reduction, the graduated filter, adjustment brush options (with teeth whiten and skin soften modes), and the crop option that allows me to crop and re-align efficiently.

If you haven't tried it, you can download it and try it for 30 days... just beware if you have an older machine, it may be a little overbearing on your RAM, Video RAM, and hard drive space, as most Adobe products seem to be.

Here is a screen shot of the Web part of the program.
Check out my Test page created in Lightroom.

In these images, I only warmed up the temperature to 5800K and then played with the graduated filers to selectively underexpose different parts of the images.  I am willing to share those presets.