Wednesday, December 31, 2008

christmas morning stills

as I was talking with my wife, I told her I wasn't going to pull out the video camera this year. Firstly, I wanted to enjoy being there, not behind a camera continually. Secondly, I didn't want to edit more video (it takes too long). So here are a few of the pictures from opening presents. And here is the lighting scheme. These flashes were set on TTL (through the lens) so they let the camera do the thinking. The 1st flash through umbrella was set about 4 feet up on a stand and the 2nd one was down at about 2 feet high. This allowed for a dichotomy of light (brighter from the 2nd flash)
And even though I am normally shooting in M mode or A mode, this time I used P mode and was pleased with what the camera gave me.


This shot of Amber was just holding the flash pointing straight up in the room in my left hand.

The shot of Scott sitting on carpet was on camera flash pointed at ceiling.

PICK OF THE DAY

Thursday, December 11, 2008

Shooting Tethered

So I have seen lots of people, via the internet, shooting tethered. What is that? Well, here's what it looks like.


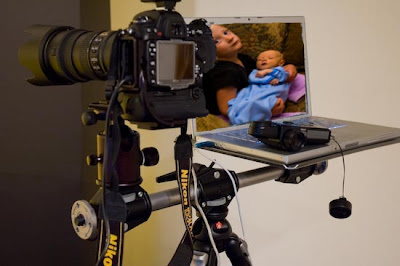
Forgive the quick and dirty (GIMP'd) image on the laptop.
What happens is the image you shoot goes directly to a file on your computer almost instantly after taking the shot. This seems to be especially useful for portraits... it is a controlled environment, and you want to ensure you have a well lit, sharply focused shot.
The benefit is that the computer screen gives you a larger viewing area than your LCD on the back of your camera and a more accurate idea of what this end-product really looks like. In addition, your subjects can then come over to the computer and actually see what you have shot as well.
I want to try this with a load of portraits at the ward party this weekend.
So how do you do it?

Well, I use Bridge and a Mac. As I was reading yesterday, it appeared that I needed system 10.5. But after a trial with my 10.4 system at home... it works flawless.

Here's how...

Set your camera (on Nikon it is in the Set up menu; down to USB; select PTP (there are 2 options on mine... one is mass storage and the other PTP).
Plug in your camera via USB to your computer.
Then open Automator which is found in Applications folder. You will need to download this little file which allows your computer to see grab those files from the camera and it will put them in your picture folder.
Open Bridge and select to view the picture folder.
You will see the pictures come onto the screen as you shoot. So cool!

By the way, it still stores the pictures on your camera as well as sending them to the computer instantly and automatically.

If you use Lightroom

If you use Aperture

Sorry, I didn't include PC usage, but I have read that it is equally possible with Windows

Friday, December 5, 2008

Photoshop Friday

Hmmm, where did that week go? Well, I am going to cut back on blogging to this site... I am going to try 1 or 2 a week. That's probably enough to ruminate on anyway.

Photo today is one we took in Zion National Park on a canyon called Mystery.
This shot was taken by my friend who had a great little PAS camera. The quality of these images was fabulous, but the vibrance of colors was lacking.

If you have photoshop CS3 or CS4 they have included, in Camera Raw, a similar function called Vibrance next to the Saturation slider. For some landscape shots, and if you don't have CS3 or 4, this little action is great. Here is the download

Let's take this image from our trip...


When I apply that action, it makes 3 additional layers... each one having more vibrance. Click off of the 3 square boost for this image. You will see a little better balance. Now change the layer opacity down to about 55%... your layers palette should look like this...


And you image now should look like this...

And this vibrance shift really illustrates the true colors of that wall. We were in awe... and it's nice when you can more closely match that brilliance.
SIDE NOTE: The LabBoost1square is just 1 square instead of 3. If I use this technique with portraits, I only hit them with 1 square, so I made this action for portraits.

Pick of the day--
found on flickr
This shot was taken with a PAS camera but they used an f-stop of 4 which led to the nice depth of field. Well done with a PAS camera. These were just below the top of Timp