Wednesday, November 26, 2008

Photoshop Friday - early

Since I am taking off Thur-Mon for Thanksgiving, I thought I would jump to a photoshop Friday early.


At the risk of using a friend's image without permission, I go forth with a photoshop tutorial today.

Lens Blur tool (DIY depth of focus)

Jason is, in my opinion, a great photographer; I really like the way he captures people and feelings. He recently posted this engagement picture that he took. I really like the perspective and the lighting is superb. Great capture. This image is perfect for illustrating a photoshop'd focal length blur.

This is when I wish I could do a video tutorial, because it can get a bit laborious describing and reading this explanation... so hopefully you can bare with me.

First I copy the layer (command-J) on the mac
then I make a layer mask.
I then use the gradient tool and drag a line through the mask.
Now your layers palette might look something like this...
click on the part of the layer that I have placed the big black arrow on and go to the Filter menu and down to Blur and on to Lens Blur
my settings on Lens blur look like this:
Click on the image between the faces of the couple. You should notice that their faces come into focus and the rest becomes blurred.
(feel free to click around a couple of times at different spots and notice how the area you click becomes focused while leaving the rest blurred (according to the layer mask))

Alright... I hope you're still with me.

Click on the OK button and now on the layers palette drag the layer mask to the trash and hit the DELETE button, not apply.
Make another layer mask and then you can start to paint away the blurring that you don't want. Change the opacity of your brush to give it a gradual look or use your gradient tool again if you like.
Your layers palette might look something like this now.

Here is my final product...
I also added just a little bit of darkening vignette to give more attention to the couple.
Again, great picture to work with here... allowing a some fun post-processing.

Thanks Jason for allowing me to alter your image.

Pick of the day:
This image is taken from Fort Photo's flickr collection. He has some real gems.

Tuesday, November 25, 2008

DIY Links

So I am running a little low on free time at work today, and I wanted to keep this a morning post... Here's my best shot.

Here are some links that I have found helpful... on making your own equipment... because heaven knows, this stuff really starts to add up.

Homemade Bounce Toys

Studio Lighting Equipment -DIY

photo of homemade flash toys

Don't do this at home

And a not home-made one. This is one of those tools everyone should have. It doubles as a reflector and a diffuser. I use this to bounce my flash, bounce the sunlight, and to diffuse my flash or the sunlight. It has a silver reflector, a gold one, a silver/gold mix, and it folds up. A must have for portraits.

Pick of the Day:
I really like this perspective... the rich colors, and the lighting nailed it. I like the complimentary highlights on the tractor and the barn in the background. I also enjoy the lines in this image.

Monday, November 24, 2008

Aperture

a few thoughts on aperture...

wait... a few thoughts on LENSES first. Lenses first, because the type of lens you have decides how open you can go with aperture. There are 3 types of lenses out there, and I will try to keep my bias out of this.

1- kit lenses (these are the lenses that comes with a camera kit) i.e. purchase the Nikon D300 or D90 at your local store and it will have the option of being bundled with a lens that offers a fairly wide range of zoom and a variable f-stop (3.5-5.6). At wider angles this lens offers f3.5 but as you zoom in, the f stop is only capably of 5.6 as the largest aperture. Usually the focus motor on these kit lenses is par (not real fast and sometimes prone to wear out before the camera body does)

2- professional lenses - "fast-glass" As far as I can tell, they are called fast for 2 reasons... because they are f2.8, you have a larger aperture and allow more light in. That allows for faster shutter speeds at lower lighting conditions. Secondly, they have a faster focus motor in them. In addition, they are generally made more robust than the kit lenses. These lenses usually cost about 3 to 5 times more than the kit lenses.

3- third party lenses (like Sigma and Tamron) If you are seeking fast glass but can't afford the name brands (like Nikon or Canon) these can offer a comparable alternative. They can be had for about 1/2 to 1/3 of the price of the fast glass.

So with that out of the way...let's move into APERTURE.

Dept of focus is often a sign of a professional lens versus a kit lens, (and coincidingly, a professional looking picture and a point and shoot (PAS) look)
Question: How do I get a smaller dept of field?
3 ways - wide aperture (like f1.4 or 2.8), zoom lens, and put your subject far from their background. I don't have time to go into the details of why, but check this out for the mathematically-inclined or this site or this site for a lot of detail or this site for the basics
An example... I used all of the previous techniques in this shot... f stop of 4 (I believe), 300mm (450mm on my D50 body), and background quite far from subjects (like 50 feet or more)
sister family3

Question:
What f-stop should I use for portraits?
Most of the time I use between 4 and 5.6. If you go too big on the aperture, your front row will be in focus while your back row is out of focus. Also, remember to have all of the people in your portrait about the same distance from the camera. If the group is large (8 or more people), you probably will do better to bring the end people closer (like a semi-circle) so that all the people are the same distance from the camera. This allows for the photographer to keep a 4 or 5 f-stop and maintain good lighting.
Another reasons for 4 to 5.6 is that they bring in more light than the f8-f11 and allow for faster shutter speed (less blur from movement in your subjects is pretty critical).
Also, if you are using artificial light (flashes AKA "strobes") they have only so much power to put out. As you decrease your aperture (go toward 22) your flash has to work harder and harder to give you the same amount of light. This is another discussion for another day, but the short answer is that your flash output is directly related only to your f-stop, not to your shutter speed.

Question:
When would I use Aperture priority (A) or Manual (M) mode instead of shutter priority (S)
A: when you are concerned with depth of focus, usually close-ups or portraits
Times when you would not use aperture priority is landscapes or on a vacation where you want your subject and your landscape both in focus.
Or you probably would not choose (A) when there is a lot of action because it can force the shutter speed to be slower if lighting is low

Pick of the day: found on flickr
f/22 46mm ISO 200


I love the composition of this shot. Love the framing of the rider with the horns. I like the rider looking to the side.
There are a couple of changes I would have liked to see with this shot. The sky is obviously blown out (stark white) and the brightness and focus of the mountains behind the rider are drawing attention away from the rider.
It appears that the rider was originally quite shadowed, so they hit this image with the fill light feature in Photoshop or Bridge (you can see the graininess of the rider, which shouldn't be the case with ISO 200) . Furthermore, I have noticed that fill light gives some detail back to the shadow areas (the subject) but doesn't give the subject the due attention that additional light would.
So, at your own risk of ticking off this bull with a big reflector or a flash: big silver/gold reflector lower left or an off-camera flash lower left would really help the subject stand out more. If I used a flash I would probably underexpose by a couple of stops and set my flash on plus a couple stops (this will be it's own blog). But the intention here would be to expose more correctly for the sky and decrease the attention given to the bright hills behind the subject. (Yet another blog will be on syncing your flash above shutter speed of 250). Simplified, just use a fill flash on this subject and call it good.

Friday, November 21, 2008

Photoshop Friday I

Photoshop Friday:

If you've worked with photoshop much, you probably know that there is almost always at least 3 ways to do the same job.

So here are three ways to lighten the unwanted darker parts of your picture.


First of all, the most crude way is to go down to the layer options and choose Levels...
slide those slider triangles back and forth (3 of them) and see what your image does. This can be a good place to start, but more often I go with option 2 here. I usually use a mask layer and paint or use gradient tool after this effect.

Secondly is in the Image menu go to Adjustments and down to shadows/highlights... This one works more effectively, I think.
This does a pretty good job of lightening those shadows and toning down the highlights. Play around with this one a bit. Add a mask and then on the mask layer try the gradient tool.

Thirdly is an action I made from a tip on photoshopkillertips.com
Here is the action to download... it is very simple. Here are the steps, and you can record it to your own action very simply.
Make a new blank layer with the new layer icon in the layers palette.
Hit Shift F5 or go to menu Edit and down to Fill. In the drop down box, select 50% gray and hit OK
Then choose layer style Overlay on the layers palette
(not quite done)
choose the brush tool and select your opacity to between 15 and 25% and hit the D key to make sure your color palette is black and white
Now you are ready to paint in some highlights and darken some areas. Just start brushing and hit the X key to switch from lightening to darkening.
Here is the tutorial from Matt Kloslowski - about 17mb

Have a great weekend!

Pic of the day:
comes from a friend of mine...

great treatment... the stylized look really adds to the animation of this photo. Love the lighting... no harsh shadows, simple white background and great composition. Great close up portrait. Nice job! Note the reflection in the glasses... I hope to address relfected light and family of angles in a future blog.

Thursday, November 20, 2008

light as matter

D&C 88:12 Which light proceedeth forth from the presence of God to fill the immensity of space—

Light as matter - some basics and some rules - gotta start somewhere!

First of all, thanks to those who commented. Feel free to shoot some questions out in your comments as we get going and anyone can feel free to answer. This is definitely a group exercise.


There are lots of sites out there to explain the nitty gritty of how your camera works. They do a much better job than I could hope to accomplish. I will try to link to a couple of these sites in case you need more explanation on a topic. Once you have a basic feel for how your camera works, then you need to learn how to work your camera (ie, make your camera work for you). Most everyone knows if they like a picture, and as you look at pictures, think to yourself what you like about the picture... is it that you are eye-level with a 2 year old, is it that those colors have fun written all over them, is it that the picture gives you a certain feeling. So this is the purpose of learning how your camera works... so that we can share through this light-writing, what it is we feel when we are there. For lack of a better term, we are communicating in a big way with our pictures. That's when photography gets crazy fun!

So, for those who already know this material, humor me for a day and this will probably be a brief review –

Look for 3 main factors – SHUTTER SPEED, APERTURE, and ISO

Light is explained in a unique way by almost every science… physics, biology, art (forgive me for lumping art into one), religion, etc.

For today, let’s say light is like water… and your camera (or the sensor part)… the bucket.

When the light fills the bucket to a set level it looks right (not too full, not too empty) and that’s what is called “correct exposure”.

If you have a DSLR your camera has a light meter built in to it. When the lines lie in the middle of that meter, it resembles 18% grey (what appeals to the eye) More on that here. As an aside, some people prefer to set an exposure compensation down 1/3 stop. More to come on that in a later blog, probably tomorrow.

You can use the light meter in Manual mode, or you can leave it to the camera to use the meter in (P) Program, (A) Aperture priority, or (S) Shutter Priority modes.


In case you don't understand my explanation below there is a somewhat dry but thorough explanation here

Correct exposure is like baking cookies… put the dough in the oven and you expose that dough to energy in the form of heat. Leave it in too long, or set the oven temperature too high, you have crispy critters. Take it out too soon and you have mushy centers.

Like the oven and like the bucket, the camera is a receptacle - a receptacle for light. And there are settings that control the amount of light that enters the camera and exposes the cookies (the sensor). Like the settings on the oven control the time the cookies are in and the temperature to which they are exposed... so does your camera have settings of shutter speed (how long sensor is exposed to light) and aperture (how much light is entering at any one time - kind of like the temperature setting on oven)

The camera has been called a “black box”. It is devoid of light until you (the artist) allow it to enter. The light that enters exposes the film or sensor and creates an image on the film or sensor.


SIDE NOTE: Ever wondered why colors on digital sensors (digital cameras) don’t look like colors from film cameras. Here is a good read about that.


So, what about that analogy with water? We have a bucket that holds water. We are going to place a hose into the bucket. The longer we leave the hose turned on, the more water enters.

This is the shutter speed. The longer you allow light to come in the camera, the more exposed the sensor ends up… leave it on too long, you get white (burned out) areas of the image. Don’t leave it on long enough and you won’t see much more than faint shapes.

Shutter speeds vary quite a bit (from 1/8000th of a second to seconds or infinitely long). Most DSLRs have a B setting which stands for Bulb. This means as long as the shutter release is pressed down, the shutter will be open. Just for fun, go to flickr.com and search for 10 second exposure. Make sure you have a tripod and a cable release (or remote)


(Take this next part slowly)

Secondly and thirdly is the flow of the water. Flow is determined by speed of the water going in AND the size of the hose. The speed of the light (photons) entering the camera are set by nature… every color coming at it’s own speed, so this is irrelevant to the settings of the camera. The relevant part is the size of the hose (or the opening of the aperture). That’s the f-stop, the aperture, or the size of the opening.


If you look closely, you can see blades that close or open depending on your f-stop setting.


Thus, a larger f-stop is a smaller number… why? Because it is a fraction. F-stop of 22 is really 1/22 (that’s a small piece of pie). Whereas 2.8 is really 1/2.8 or just more than 1/3 (that’s a big piece of pie). You just have to remember that a larger aperture is a smaller whole number… ie 1.4 is a really big aperture and let's lots more light in.


Finally, the kicker! You thought we were done, didn’t you? There is a third and quite important factor… the bucket size (or the ISO). Now forgive my toilet analogy for this next part, but this quick story will help illustrate my point. The other day (for months now) our main toilet has had a slow leak of water from the reservoir into the bowl. I went down and got the correct replacement parts and got to work on it. And here’s the part that relates. There is a plastic insert bucket in our tank that allows for only a little water to be used at each flush. In other words, it conserves water. The pros are that it only requires about 1/2 liter to flush the toilet instead of 1.6 liters. The downside is that there is less pressure to push the waste down the line. The ISO is that plastic insert bucket. A larger ISO (say 1600) is a smaller bucket and allows for a small amount of light to hit the sensor for the same exposure. A smaller ISO (say 100) is a bigger insert in the tank. But if you have tons of water (light) at your disposal… use it… it’s a lot more bang for your buck. And it is pretty well mathematically related... if your bucket is twice as small, you can get the same exposure using half the shutter speed. IE try this... set your camera on manual and set it at 200 ISO. Now change the ISO to 400 and see how much shutter speed or aperture (separately) you need to move to get the same exposure. This is a helpful little exercise.

-I hope I didn’t lose anyone on that whole story

So, the higher the ISO, the smaller the plastic insert or the less light required to expose your picture. The problem with higher ISO is the picture has more noise and less integrity. The sensor has to fill in the details with pixels.

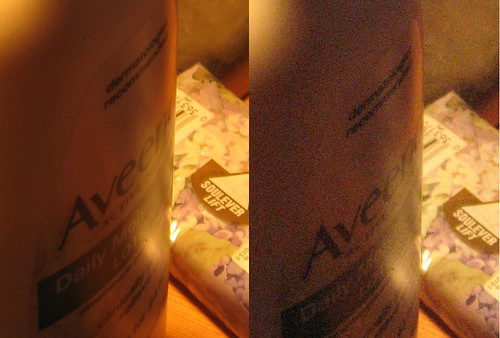
This low light photo helps illustrate ISO noise ISO 200 on left, ISO 800 on right.


One other note on ISO noise... longer exposures introduce more noise as well, regardless of your ISO.


Case Study 1:

So you’re shooting at your brother’s wedding. You’re in a poorly lit room (church or cultural hall). People are mingling (moving). You want some candid shots. What settings? Oh, you don’t have a flash.

My answer:

Put your camera on ISO 800 or 1600 (some of the newer DSLRs can get away with ISO 3200). Use (A) Aperture priority so that you are controlling your f-stop (go with about a f stop of 4), and see what kind of shutter speed your camera picks. If you are at 1/20th of a second (20) or faster on shutter speed, you will probably be ok. Any lower and you better ask people to stand like statues so your pictures aren’t blurry and/or have a tripod. One other thing… you may need some noise reduction software for post-processing so that your graininess doesn’t distract from the images.


Case-study 2:

Bright sunny day on the slopes of a nearby ski resort. Friends going off a jump and you are set up as the photographer.

Answer: I probably want fast shutter speed so my jumper isn’t blurred. And I have tons and tons of light (esp from the snow reflection) so I set my camera on (S) shutter priority (500th of a second or faster), and my ISO can be as low as she goes (100 on some, 200 on other cameras). Oh, remember to put it on high speed continuous shot so you don’t miss that shot.


Again, feel free to comment, correct, or additional insight and questions.

Tomorrow we will try to take a step further into personalizing these settings with exposure compensation... fun stuff! Maybe even introduce some flash compensation into that and a dash of lemon pepper.

Oh, I will try to pick a photo I like (usually from one of my contacts on Flickr) and comment on it.

Pick of the day:

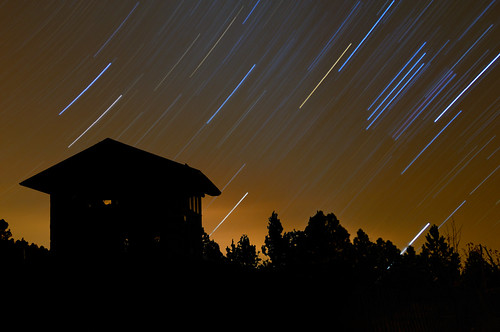
This shot was taken for 46 minutes... at ISO 400. Most likely it was post-processed using a noise reduction software. If you have your shutter open this long, the processor in your camera will take a long time (minutes) until you can take your next picture.

Wednesday, November 19, 2008

Genesis

Moses 2:16 "God, made two great lights; the greater light to rule the day, and the lesser light to rule the night, and the greater light was the sun, and the lesser light was the moon; and the stars also were made even according to my word."

To begin... my history in photography. My dad took an Olympus single lens reflex camera (SLR) on his mission. He had some skills in photography... a basic understanding. In high school, he bought me a short-lived Olympus SLR. Short-lived because it was when Olympus was phasing out of SLRs and focusing on point-and-shoots (PAS) and it died a sick death, with a cheap replacement sent to me after much travail. We took a private class together where we went to La Caille and Temple Square at Christmas-time. I learned the basics of exposure and using tripods during that class. I then purchased a Nikon SLR shortly after my mission. I shot with that for quite a few years, practicing what I had learned during high school, and mainly using Program Mode (P).
That camera got shelved for a while (about 2000) as I turned to a PAS Olympus digital camera.
Finally, a friend of mine taught me about his leap into the digital SLR world (DSLR) and I haven't gone back to my film Nikon since... in fact I just sold it recently.
Now I shoot with a Nikon D200 (started with a D50 and shortly demanded more from my camera) and mainly 2 lenses (with 2 others on the shelf)... a f2.8D Nikon 17-55mm and a f2.8 70-200mm Nikon lens. My other gear includes 2 SB600 speed lights (flashes), 2 white umbrellas and 1 silver umbrella, 2 light stands, 1 tripod with a Gitzo head, 1 50mm f1.8 Nikon lens and a 300mm f2.8 Nikon lens (1977)
My photos can be seen at my flickr account

Some topics I hope to cover (in no specific order):
exposure basics
flash photography
choosing a camera
post processing
lens choice
cropped sensors vs. full size sensors
camera settings
AND hopefully much more

Please leave a comment. Thanks

Saturday, November 15, 2008