Wednesday, December 15, 2010

using available light

At times, a flash is inconvenient or even not available. So how do we maximize the light that we have? First of all, use the lowest f-stop you can while still maintaining a good focal length (see this link for more on f-stops and focal length)

The bigger the aperture (the lower the f-stop number: like 3.5 or 2.8 or even 1.4) the more light we let in. So we are able to use the available light. In addition, we can increase the ISO to around 800 to 1250 (or even to 1600)

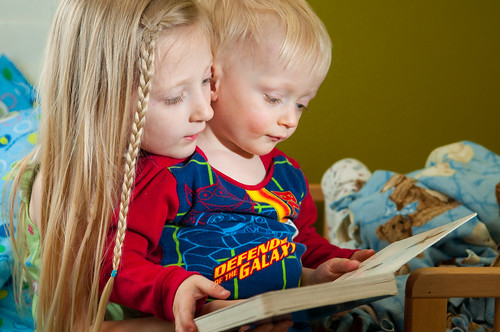
Camera set on A (aperture priority) So with these 2 preparations, we are ready to capture some images. Wait, we need a setting and a subject. So, I took my kids... naturally. I put them in a reflected light. The sun was coming through the window and bouncing off of our white fridge. It was actually a little hot (too bright) but it worked. At first, my images were too bright because my light meter was set on "spot metering". Because the center of the image was darker, it overexposed the reflected light. To fix that, simply put the metering to "matrix metering" and it should compensate for that light.

Place the subject out of the direct light coming in, or you will get hot spots like this image...
From 20101212

Move the subject so that the back of their head is in the direct light and it looks like this...


From 20101212

Move them out of the direct light all together...
From 20101212

And finally, one more...
From 20101212

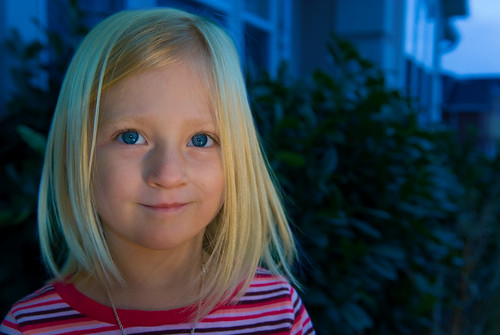
So, the pick of the day will be a different setting. Subject with one light coming through the window. Window at 2 o-clock and photographer at 6 o-clock.
From 20101212
Same settings used on the camera for all shots.

Tuesday, December 7, 2010

worth noting

I have mentioned Dave Black previously. Here is a snippet of him using some serious lighting power (eight SB-900's )

Monday, October 4, 2010

Flash as sunlight

In today's world of bazillion wedding photographers, it really seems that if you have a style that stands out, you are more likely to attract business. Many photographers have grasped the low depth of field that makes their subjects stand out. But what about using light to make your subject stand out. So I have been studying this photographer's images and tried to recreate his style. For me, it's a challenge that extends my abilities, like going to a restaurant, finding something you like, and then trying to recreate it at home from scratch.

So, how were these images captured? The highlights that you see are not from the sun, but from a flash a couple of feet above the subject. So, I underexposed the image by about 2 stops (change the EV on your camera to -2) and then put the flash on TTL (auto) +1 stop. Then take the image into adobe bridge and give a little more exposure to your subject. If I have time later, I will put this in detail as a tutorial. Give it a try.


From 20101003_to_post
Grouchy face  mommy :)
From 20101003_to_post

Monday, August 30, 2010

Depth of Field

So, here's a tool that I have found quite useful lately. It's called Simple DOF and it help you determine how much of your subject/s will be in focus. This is critical to understand while shooting portraits of more than one subject.

To illustrate... let grab an image...

So my girl is in focus. My boy... well, there goes the picture... he's not in focus.  The boy is about 2 feet further from the camera than the girl.
Clearly I intended for both to be in focus.  But it appears that we are giving some precedence to the girl here. I need to explain what I could have done to avoid this error.

First of all, because it was in the evening and I wasn't willing to push my ISO up (it is at 125 for this shot), then I had to use a larger aperture (f3.5 here). So I should have pulled out my DOF calculator (Simple DOF). I punch in that I am roughly at 34mm on my D300s camera (51mm on a full sized sensor), I was roughly 5 feet from my subject in focus (girl). The calculator tells me that my DOF is 0.85 feet. That's 10 inches.  In other words, everything from 5 foot 2 inches to 6 feet away from camera will be the sweet spot of focus.  Because the boy was more like 24 inches away, he falls in the out of focus zone.

So what could I have done differently? Well, I could have placed them equal distance from the lens. Pull the boy closer or move the girl further, or simply repositioned myself to be equal distance from both. Well, 10 inches isn't much room for error in estimating distance.
But here is an example of the same area with the same fstop. Notice both subjects are in focus here.
Same f3.5, but I backed up a bit, maybe 10 feet away, and 55mm. Now my Simple DOF calculates the focus to be 1.4 feet. That gives me almost 17 inches of focus rather than only 10. In addition, the two subjects are almost equal distance from the camera. So that gives me the focus on both of them while still getting the blurred background, so as to not distract from my subjects.

Well, that was a lot of talk... but hopefully you've learned something about calculating the dof. Google DOF or depth of field and read up a bit. It is very critical. I will end with this one where I shot 23 people and needed them all to be in focus. Fortunately, I had my ipod with me with Simple DOF on it, I used it, and it worked out. I was about 35-40 feet from the subjects, f2.8, and 70mm. That gives me around 7-10 feet of focus. I also tried to place everyone semi-equal distance from the camera by pulling in the sides and pulling forward the people on the top row. And it was nice to still have some background blur to contrast with the focused people.

Thursday, August 19, 2010

2 light sources, one sun, one strobe

Just a note about evening light and fill flash.  Sunsets can produce nice warm lighting; but can also produce long harsh shadows.  This evening I took this one without a flash in my front yard... forgive the subject matter, it's not the most aesthetic.
I am shooting at ISO 100, f4.0 and 1/320 at 38mm.
For the record, I metered at around /125 and then stopped it down faster a few stops so that I wouldn't have the sun blowing out (too bright) on the back of the subject.  Plus, I knew I would be adding a flash to fill in the underexposed areas.  This is a nice trick, because then the background is also a bit underexposed and doesn't get all the attention it would if it too bright.  So, I add a flash to the right.  While the sun is coming in camera left, the flash was placed directly opposite.  No umbrella, just straight flash.  I put it on manual and stopped it to 1/16 power.  Here's the difference..
I could have used a reflector, but then there is the element of not knowing how much light is really reflecting.  The flash allows me to control that power.   Although the flash is cooler light than the reflector would be.
I zoomed in a bit to 55mm and found a bee for the final shot.
Notice the lighting from the right still fills in some of the shadows that would otherwise be a bit too dark for my liking.

Pick of the Day


I have added this photographers blog to my reader for some inspiration on lighting examples of weddings. He's got some good stuff. I would be interested what the source of light was for the front of this subject. Definitely the sun is behind her, but is it a flash or a bounce reflector in front??? Very possibly, there was someone holding a reflector down in the lower right, but he may have added this dark feature in photoshop to cover that person. We may never know.

Monday, August 2, 2010

Skies

An incredible evening of light and magic. When the light from outside starting pouring yellow abundantly in through the windows, I knew it was time to grab the camera and head outside last night.

Tip of the day... if you have a PC (heaven forbid ;) ) and you are looking for a good program to manage your images, I have a favorite. Thanks to Rich (whom Spence and I met in Yellowstone) for turning me on to this... it's called FastStone Image Viewer. Check it out... you may convert. I use it at work since I don't have Adobe Bridge/Photoshop.

This first shot is straight from the camera, no editing.

Tuesday, May 4, 2010

1 light or 2

Setting: the family is on the rug reading and working on homework
Lighting: evening, so just some mild fluorescent bulbs above subjects
Thoughts: they are low to the ground and I don't want to pull out the umbrellas and the light stands. So I grab the reflector (silver/gold side out for neutral warmth) and grab an SB600 flash with the little plate it comes with for setting down on the ground. I place the SB600 in front of the reflector, pointing directly away from my subjects. Then I grab my SB800 with the diffuser on it and put it on my camera. I am actually about 12 feet away from my subjects, but the SB600 is about 5 feet from them.


Settings: the SB600 is set at TTL (through the lens- basically, this is auto setting, and the camera decides what power to put through it). I've got a long lens on to get close in (shooting from 160mm to 200mm) I am also shooting at f2.8 and 1/80. I chose 2.8 because I am trying some focal depth experiments with my long lens and it lets my flashes work at a lower power. I chose 1/80 because anything slower seems make my subjects movement show up (out of focus).
The SB800 is on 1/124 power (so virtually nothing... just used to fire the SB600) and because I am so far from my subjects, I am essentially just using one flash here.
Fire a couple of shots...


I like the focus on my subjects, but the background is really dark... too dark.
So I increase the power of the SB800 to about 1/2 power (really get some ambient light around them). No other settings changed. (I could have just changed my exposure to 1/20 or 1/15 instead of 1/80, but then I risk out of focus subjects, esp the spontaneous pics I was shooting). Or I could have increased my ISO to 1600, but that's really going to make it grainy with my camera.
So a couple of shots...


So I like the fill light that brought my images.
Parting shot... I really like this one because I like broken light, when it finds its way to your subject

Thursday, April 8, 2010

use of the snoot

What's that??? A snoot. It essentially tunnels the light like spot light.
I may have mentioned the use of one before, but I was introduced to it by reading Dave Black's page

So generally don't use it as the only flash. Here I used a flash pointed at the ceiling to get reflected light and then increased the power on the flash with the snoot on it to get a focused, directional light.

This next shot, I increase the light that was pointed at the ceiling to minimize the contrast in the lights. I am shooting these at about F4 and between 1/30 and 1/80 of a second with ISO between 100 and 200 in full Manual mode. I find that I generally get better results with 2 or 3 flashes when I go manual on cameras and manual power on the flashes.

For these next shots, I kept playing with the settings of the two flashes to even them out a bit. I find that even at the same power, the snooted flash gives a higher intensity, simply because it is not diffused or reflected, it is direct, and focused by the snoot.

I like not having a shadow behind the subject... to avoid this, increase the intensity of the reflected light (or ambient light with the shutter time being longer) and don't place an object close behind the subject (in the plane of the snoot and subject -hope that made sense

So, then it was time to try 3 flashes - I picked up a lightly used SB-800 a few months ago and am thrilled with it. Unfortunately they don't make them anymore. But they allow you to have an on-camera flash (I usually point it to the ceiling or wall to have reflected light) and still command the other flashes with the SB-800 (in other words, the SB-800 has commander (remote) mode and the two SB-600s I use are the slaves).
This final shot I was really happy with the balance of lighting. I have an SB-600 on a light stand behind the subject (so camera left) shot through a white umbrella at 1/16th power. I also have the on-camera SB-800 at 1/16 or 1/32 power, pointed toward the ceiling with a diffuser on it (just to bounce the light a little before it hits the ceiling)*** And finally the snooted flash is pointed directly at the faces and is also set at 1/16 power. I moved the flashed to be about 4-5 feet from the subject. Without photoshop on my work computer, I won't try a lighting diagram, but maybe I will add it later. reading

*** the diffuser looks like this

Monday, February 8, 2010

beware of mixed lighting

A couple of years ago, I was shooting my daughter holding our infant son. I used a fill flash to the side, but had a horrid greenish hue to the picture. Someone wisely pointed out that I was probably shooting in a room with fluorescent lights. They were right.
So what do you do to overcome that.
1- You can use a light modifier (they call them gels)
2- You can turn off the indoor offending lights and use your own lights (flashes)
3- You can ramp up your own light (flash, strobes) to overcome the ambient light that is causing the hue chaos.
 There is much talk of this mixed lighting... check out the strobist's blog on using gels to correct for this color.
Anyway, I took a shot today with just our indoor lighting on one side and the morning light from the window left of subject. Here's what you get.  (And I corrected for the indoor lighting)
We could have corrected for the outdoor lighting, and that shows the super-warm temperature of the indoor light.

Not that we always have to have perfectly uniform lighting... We just have to be aware of what hue each light will bring to our image. So simply stated, greenish = fluorescent, bluish = tungsten. Play around with the white balance on your camera or in your photo editing software afterwards. And then you can take it to the next level with gels (more to come).

This image I will use as pick of the day... even though it is really just an example of my next blog.
CTO gel

Saturday, February 6, 2010

reflector

So, we're sitting down to dinner on Saturday late-afternoon... Amber was setting out the food, and the sun was coming through the window... perfect shot, I thought... just needs one thing - my reflector.  I have a 41" reflector that a neighbor gave to me in a broken state.  After some time I got around to fixing it, and don't know what I would do without it (oh yah, I do, I would miss a shot like this one)  So the sun was obviously coming in from the camera left and the background was not being hit by the direct sunlight.  Direct sunlight causes such harsh shadows, even when it is coming in through the kitchen window... so grab a white, silver, or silver/gold reflector for the other side.  My 7 year old is getting proficient with holding it just right. And this really overcomes some of those harsh shadows.  Here is the product (sorry I don't have a shot without the reflector)
 
and here is the lighting schematic.
 
Reflectors can be really good indoors and outdoors.  I have seen some photogs who like to sit their subject just at the edge of a shadow (outdoors) and then go really close with a reflector.

So, the pick of the day has a link on it... click on the picture below to go to Kennth Linge's blog on this same subject.

Saturday, January 23, 2010

don't throw away images - soften skin

Unless your photo is just really awful -way out of focus or cut off someone someone's head, don't throw it away.  At times I will pick up my camera for a shot and not realize I still have my manual exposure set from a much different lighting.  Like this shot.

Instead of tossing it, I thought I would try something with it.  I took it to photoshop as a black and white image, and bumped up the exposure a bit.   Then with a few selective (using some masks) exposure and contrast adjustments, I found a look I liked much better.


Here is the snapshot of the layers I used.  Sorry, no more explanation than this... but the layers should be quite self explanatory.


I realized as I was about to post this that I have never done the soften skin tutorial.
I will have to do so later, but for now click here for the quick skin fix tutorial

Sunday, January 10, 2010

focus on the eyes

In portrait photography... it is essential to have the eyes in focus.  Virtually everything else could be out of focus... but if the eyes are in focus, you have a shot.  And especially if you are shooting close-up.


shot of the day comes from what I think is one of my favorite wedding photographers out there... I really like to study his images and hope to adopt some of his style into my own. meninenuotrauka (Lithuanian, I believe)