Light as matter - some basics and some rules - gotta start somewhere!
First of all, thanks to those who commented. Feel free to shoot some questions out in your comments as we get going and anyone can feel free to answer. This is definitely a group exercise.
There are lots of sites out there to explain the nitty gritty of how your camera works. They do a much better job than I could hope to accomplish. I will try to link to a couple of these sites in case you need more explanation on a topic. Once you have a basic feel for how your camera works, then you need to learn how to work your camera (ie, make your camera work for you). Most everyone knows if they like a picture, and as you look at pictures, think to yourself what you like about the picture... is it that you are eye-level with a 2 year old, is it that those colors have fun written all over them, is it that the picture gives you a certain feeling. So this is the purpose of learning how your camera works... so that we can share through this light-writing, what it is we feel when we are there. For lack of a better term, we are communicating in a big way with our pictures. That's when photography gets crazy fun!
So, for those who already know this material, humor me for a day and this will probably be a brief review –
Look for 3 main factors – SHUTTER SPEED, APERTURE, and ISO
Light is explained in a unique way by almost every science… physics, biology, art (forgive me for lumping art into one), religion, etc.
For today, let’s say light is like water… and your camera (or the sensor part)… the bucket.
When the light fills the bucket to a set level it looks right (not too full, not too empty) and that’s what is called “correct exposure”.
If you have a DSLR your camera has a light meter built in to it. When the lines lie in the middle of that meter, it resembles 18% grey (what appeals to the eye) More on that here. As an aside, some people prefer to set an exposure compensation down 1/3 stop. More to come on that in a later blog, probably tomorrow.
You can use the light meter in Manual mode, or you can leave it to the camera to use the meter in (P) Program, (A) Aperture priority, or (S) Shutter Priority modes.
In case you don't understand my explanation below there is a somewhat dry but thorough explanation here
Correct exposure is like baking cookies… put the dough in the oven and you expose that dough to energy in the form of heat. Leave it in too long, or set the oven temperature too high, you have crispy critters. Take it out too soon and you have mushy centers.
Like the oven and like the bucket, the camera is a receptacle - a receptacle for light. And there are settings that control the amount of light that enters the camera and exposes the cookies (the sensor). Like the settings on the oven control the time the cookies are in and the temperature to which they are exposed... so does your camera have settings of shutter speed (how long sensor is exposed to light) and aperture (how much light is entering at any one time - kind of like the temperature setting on oven)
The camera has been called a “black box”. It is devoid of light until you (the artist) allow it to enter. The light that enters exposes the film or sensor and creates an image on the film or sensor.
SIDE NOTE: Ever wondered why colors on digital sensors (digital cameras) don’t look like colors from film cameras. Here is a good read about that.
So, what about that analogy with water? We have a bucket that holds water. We are going to place a hose into the bucket. The longer we leave the hose turned on, the more water enters.
This is the shutter speed. The longer you allow light to come in the camera, the more exposed the sensor ends up… leave it on too long, you get white (burned out) areas of the image. Don’t leave it on long enough and you won’t see much more than faint shapes.
Shutter speeds vary quite a bit (from 1/8000th of a second to seconds or infinitely long). Most DSLRs have a B setting which stands for Bulb. This means as long as the shutter release is pressed down, the shutter will be open. Just for fun, go to flickr.com and search for 10 second exposure. Make sure you have a tripod and a cable release (or remote)
(Take this next part slowly)
Secondly and thirdly is the flow of the water. Flow is determined by speed of the water going in AND the size of the hose. The speed of the light (photons) entering the camera are set by nature… every color coming at it’s own speed, so this is irrelevant to the settings of the camera. The relevant part is the size of the hose (or the opening of the aperture). That’s the f-stop, the aperture, or the size of the opening.
 blades that close or open depending on your f-stop setting.
Thus, a larger f-stop is a smaller number… why? Because it is a fraction. F-stop of 22 is really 1/22 (that’s a small piece of pie). Whereas 2.8 is really 1/2.8 or just more than 1/3 (that’s a big piece of pie). You just have to remember that a larger aperture is a smaller whole number… ie 1.4 is a really big aperture and let's lots more light in.
Finally, the kicker! You thought we were done, didn’t you? There is a third and quite important factor… the bucket size (or the ISO). Now forgive my toilet analogy for this next part, but this quick story will help illustrate my point. The other day (for months now) our main toilet has had a slow leak of water from the reservoir into the bowl. I went down and got the correct replacement parts and got to work on it. And here’s the part that relates. There is a plastic insert bucket in our tank that allows for only a little water to be used at each flush. In other words, it conserves water. The pros are that it only requires about 1/2 liter to flush the toilet instead of 1.6 liters. The downside is that there is less pressure to push the waste down the line. The ISO is that plastic insert bucket. A larger ISO (say 1600) is a smaller bucket and allows for a small amount of light to hit the sensor for the same exposure. A smaller ISO (say 100) is a bigger insert in the tank. But if you have tons of water (light) at your disposal… use it… it’s a lot more bang for your buck. And it is pretty well mathematically related... if your bucket is twice as small, you can get the same exposure using half the shutter speed. IE try this... set your camera on manual and set it at 200 ISO. Now change the ISO to 400 and see how much shutter speed or aperture (separately) you need to move to get the same exposure. This is a helpful little exercise.
-I hope I didn’t lose anyone on that whole story
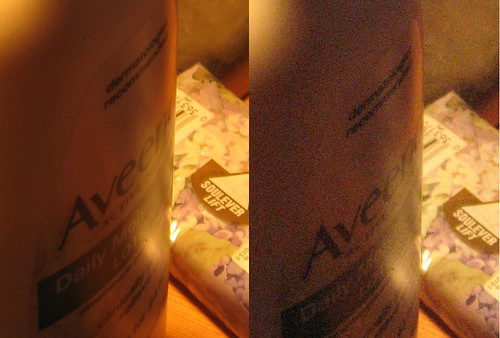
So, the higher the ISO, the smaller the plastic insert or the less light required to expose your picture. The problem with higher ISO is the picture has more noise and less integrity. The sensor has to fill in the details with pixels.
This low light photo helps illustrate ISO noise ISO 200 on left, ISO 800 on right.

One other note on ISO noise... longer exposures introduce more noise as well, regardless of your ISO.
Case Study 1:
So you’re shooting at your brother’s wedding. You’re in a poorly lit room (church or cultural hall). People are mingling (moving). You want some candid shots. What settings? Oh, you don’t have a flash.
My answer:
Put your camera on ISO 800 or 1600 (some of the newer DSLRs can get away with ISO 3200). Use (A) Aperture priority so that you are controlling your f-stop (go with about a f stop of 4), and see what kind of shutter speed your camera picks. If you are at 1/20th of a second (20) or faster on shutter speed, you will probably be ok. Any lower and you better ask people to stand like statues so your pictures aren’t blurry and/or have a tripod. One other thing… you may need some noise reduction software for post-processing so that your graininess doesn’t distract from the images.
Case-study 2:
Bright sunny day on the slopes of a nearby ski resort. Friends going off a jump and you are set up as the photographer.
Answer: I probably want fast shutter speed so my jumper isn’t blurred. And I have tons and tons of light (esp from the snow reflection) so I set my camera on (S) shutter priority (500th of a second or faster), and my ISO can be as low as she goes (100 on some, 200 on other cameras). Oh, remember to put it on high speed continuous shot so you don’t miss that shot.
Again, feel free to comment, correct, or additional insight and questions.
Tomorrow we will try to take a step further into personalizing these settings with exposure compensation... fun stuff! Maybe even introduce some flash compensation into that and a dash of lemon pepper.
Oh, I will try to pick a photo I like (usually from one of my contacts on Flickr) and comment on it.
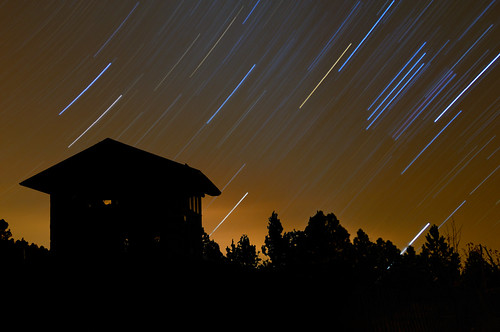
Pick of the day:

This shot was taken for 46 minutes... at ISO 400. Most likely it was post-processed using a noise reduction software. If you have your shutter open this long, the processor in your camera will take a long time (minutes) until you can take your next picture.

2 comments:
this is cool. so it was on a tripod, right?? I really like this pic. I like your site it's VERY interesting. You really know your stuff. I just play around with photoshop and hope it all works out. :)
Tori, that's one of the best ways to learn photoshop... just play around... and it's safe (you can always undo). Thanks for reading... let me know if you have any specific interests or questions... esp if I don't have the answer, I love looking into what other people are asking.
Post a Comment