
So yesterday was a review of the first 3 steps based upon a few conditions --- how close is my subject (lens), how much light do I have to work with (ISO), and do I want to add light (flash).
The next step is where there can be a lot of variability. Select a mode to shoot with. Do I choose to shoot in P (program mode), A (aperture priority), S (shutter priority), or M (manual). Let's dive into these modes.
If I want the camera to decide what settings to use, I choose P mode. I can probably count the number of times I have used P mode in the last year on one hand. But if we go back 12 years ago to my first SLR camera, I was in P mode virtually all the time. So I think of P mode as a great option for beginners. And for the more seasoned photographer, you can use P mode when you have a situation where you really need to get a picture fast and don't have time to think. This mode determines what f stop and what shutter speed. And if you have your camera in AUTO ISO, it will also determine what ISO to use.
Moving on... If I know my depth of focus, but don't want to concern myself with the shutter speed, I will choose A mode (aperture priority). This allows me to select the f-stop and then have the camera decide how long the shutter will be open based upon that need. I decide this based on two criteria... what depth of focus do I want and how much light to I have to work with. Opening the f-stop wider (smaller numbers like 1.4, 2.8, 3.5) lets more light in my lens but also decreases the depth of field (or focus depth). They are sometimes referred to as shallow focus and deep focus.
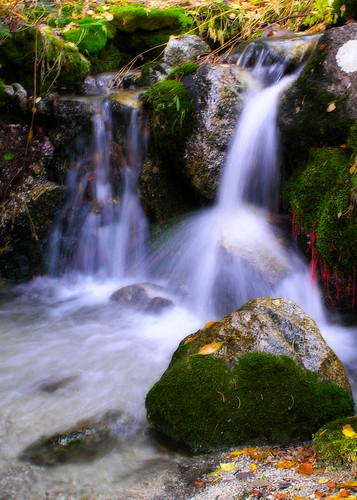
I make more decisions based upon focus depth rather than shutter speed, probably because I am taking more portraits. So for me, S mode is only rarely used. The exception is when I care about working with the motion of a scene. For example, water falls tend to look much more aesthetic when the water is flowing. In order to capture that, the exposure needs to be open longer (longer shutter speed). In this image, taken with my old Olympus point and shoot camera, I put the camera in S mode and chose a shutter speed of 1/3 (which is to say .333 seconds).
Finally M mode, or manual. I won't spend much time here in this post, but I do spend probably 60-80% of my time shooting in this mode. When you find a style that works for you, when you want full control of the camera, or when you are shooting with a flash or two or three, M mode can really give you control of everything, especially your lighting.
CASE STUDY:
My youngest child is playing in his room. There is diffuse light coming in from the window, so the lights in the room are off. Let's go through the steps so far...
I know I want to do a close up, because for me with infants, I want to capture their expressions and the details thereof. So I keep my 24-70mm lens on and I will play around with the zoom, probably between 40-70 will be what I shoot. I am thinking higher ISO because the light from the window is my only source of light and the room light (ambient light) is very dim. So I try ISO 800. I could try as high as 1600, but 800 is where I stop. Finally, should I use a flash or not? The flash would fill the background with some light and make the room look more evenly brighter. But I decide I want to have the directional lighting the window is going to provide and I don't want to mess around with multiple sources of light... just the one window light. So no flash. I know that this is a potentially moving subject, so I put it in A mode and play around with the f-stop. 5.6, 4.0, 3.2. I am doing this while pointing my camera at the subject so that the correct shutter speed is selected by my camera. I see 250 (which is 1/250th of a second). This is plenty of speed to stop the movement and create a sharp image. So I snap a few shots...
 If you look closely, you can see the window in his eyes. This use of single light source creates some good dimension with lighter on his left side of face and darker on his right side of face. In addition, the background is less exposed than he is because he is closer to the light source (the window). This helps him stand out. My focal length is 70mm (zoomed in on this lens). With the help of my online DOF calculator, I can see that my focal length is about 3.5 inches (more on this later).
Tomorrow: more talk about the light meter in your camera and making your camera see what you see.
Pic of the Day:

Finally M mode, or manual. I won't spend much time here in this post, but I do spend probably 60-80% of my time shooting in this mode. When you find a style that works for you, when you want full control of the camera, or when you are shooting with a flash or two or three, M mode can really give you control of everything, especially your lighting.
CASE STUDY:
My youngest child is playing in his room. There is diffuse light coming in from the window, so the lights in the room are off. Let's go through the steps so far...
I know I want to do a close up, because for me with infants, I want to capture their expressions and the details thereof. So I keep my 24-70mm lens on and I will play around with the zoom, probably between 40-70 will be what I shoot. I am thinking higher ISO because the light from the window is my only source of light and the room light (ambient light) is very dim. So I try ISO 800. I could try as high as 1600, but 800 is where I stop. Finally, should I use a flash or not? The flash would fill the background with some light and make the room look more evenly brighter. But I decide I want to have the directional lighting the window is going to provide and I don't want to mess around with multiple sources of light... just the one window light. So no flash. I know that this is a potentially moving subject, so I put it in A mode and play around with the f-stop. 5.6, 4.0, 3.2. I am doing this while pointing my camera at the subject so that the correct shutter speed is selected by my camera. I see 250 (which is 1/250th of a second). This is plenty of speed to stop the movement and create a sharp image. So I snap a few shots...

Tomorrow: more talk about the light meter in your camera and making your camera see what you see.
Pic of the Day:

No comments:
Post a Comment